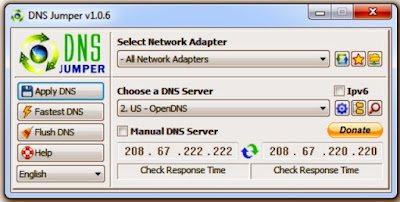
Previously, I have discussed about how to change DNS settings manually. This time, I will discuss about how to use DNS Jumper to change the DNS servers on your computer. The DNS Jumper is used to block specific websites and even accessing websites that are blocked by the operator or internet service provider.
Change DNS Settings Using DNS Jumper.
DNS Jumper is a free tool created by Velociraptor (sordum.org). DNS Jumper is used to integrate the DNS servers into the PC system automatically and easily with just a few clicks. We also can pick the fastest DNS considered at that time, this feature can sort out DNS from two different providers to take the fastest DNS, so it does not need to ping it manually. Until now, DNS Jumper is available with version 1.0.6. DNS Jumper is useful to block certain websites and of course, it can accesses any blocked websites.
How to Change DNS Settings Using DNS Jumper.
Download DNS Jumper.
Download DNS Jumper first from sordum.org, or from the website where sharing many programs such as Softpedia.
Run DNS Jumper.
Downloaded DNS Jumper is a compressed file, extract the file into a directory that can be accessed easily. Run the file DnsJumper.exe.
Find Fastest DNS.
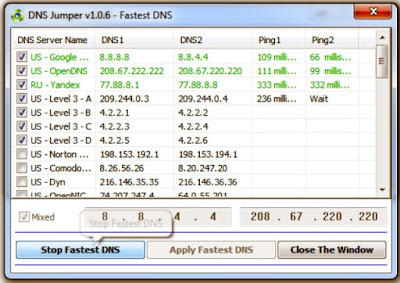
After DNS Jumper program opens, click the 'Find Fastest', there will appears a new window that lists several DNS servers. Check the check-box 'Mixed' and click 'Find Fastest DNS'. Wait a few moments to complete DNS Jumper ping.
Apply Fastest DNS.
After DNS Jumper successfully found the fastest DNS, click 'Apply Fastest DNS' and you are done.
By applying Family safe DNS, we can block or restrict any un-trusted websites, such websites that contains pornographic content or gambling. To do this, click on the DNS Groups icon near search button icon and select 'Security'. On the 'Choose a DNS Server' tab, it would be appears list of safe DNS and select a DNS as you prefered.
Family Safe DNS and Security.
Restore the default ISP's DNS.
To restore default DNS provided by the ISP, click on the dropdown button on the Choose a DNS Server tab and select 'Default' that appears on the top list. Click Apply.
Manual Setting.
To enter DNS server manually, check the check-box 'Manual DNS Server' and then fill in the DNS server that we want on the provided fields. Click the refresh button that appears like a 'rotates arrow' to ping and measuring ping speed of these DNS servers.
Hope this helpful.
loading...


